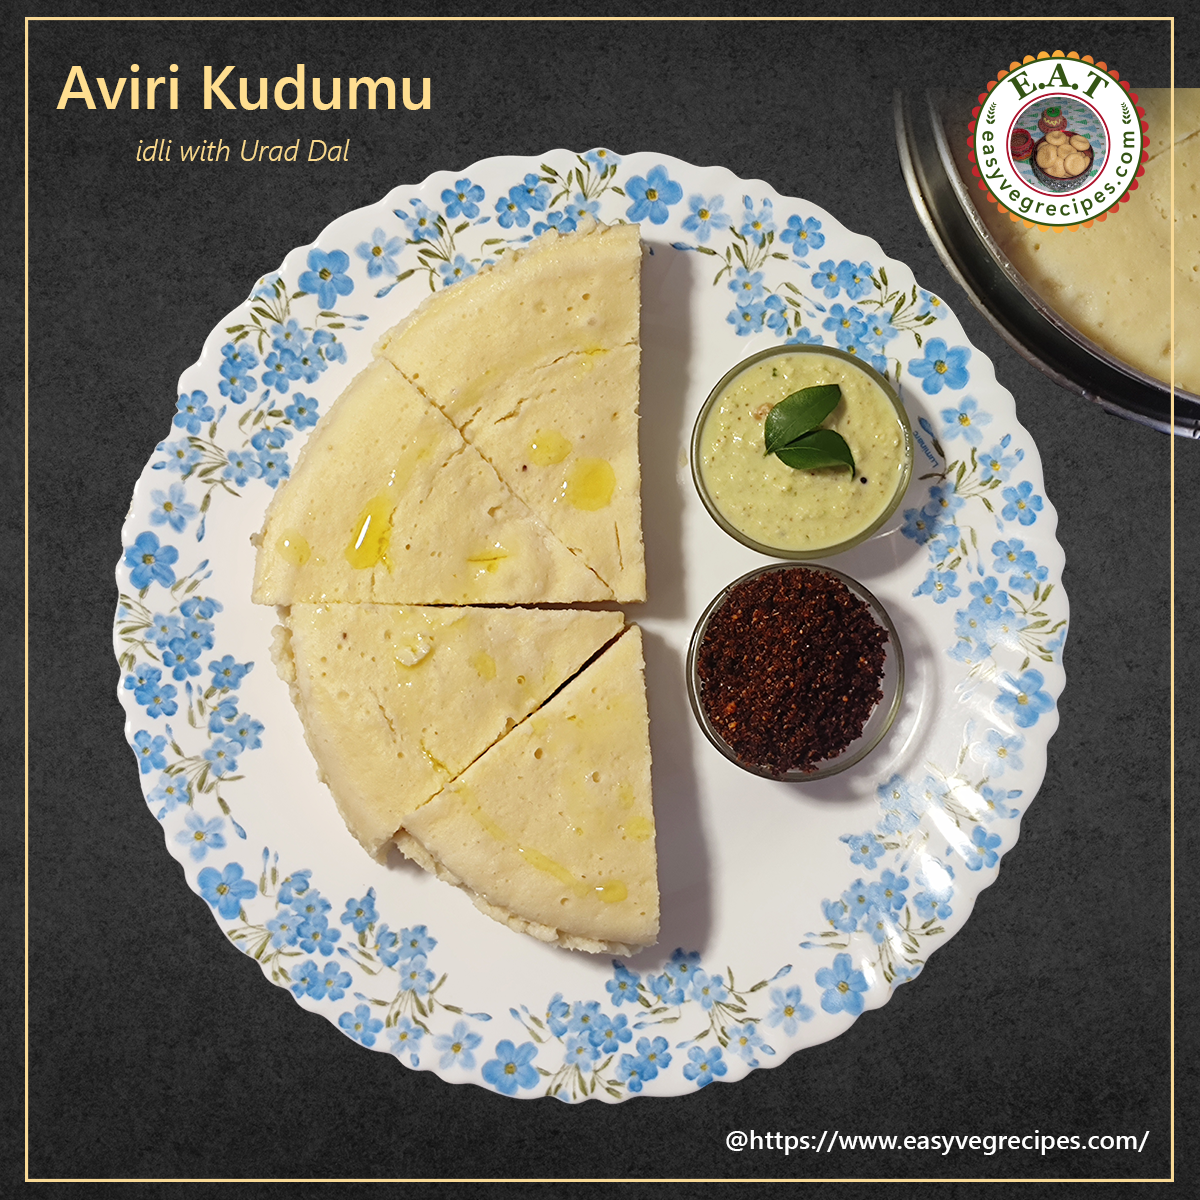
Hi friends, Today I am posting here aaviri kudumu recipe. Aviri kudumu is a Telugu word, aviri means steam and kudumu is idli. Aviri Kudumu recipe is very easy to make and it is energy-giving food. I used to have it regularly for 2 years to get iron content during my childhood days. Aviri kudumu recipe is made with only one ingredient which is urad dal or black gram or minapapappu. We can use whole urad (skinned urad) or we can use whole urad dal (dal without skin) or even regular urad dal also. Split urad with skin can also be used to make aviri kudumu recipe. Here I am using whole urad dal to make aviri kudumu recipe. Serve these aviri kudumu with coconut chutney, nalla karam and bombay chutney and lots of ghee.
Before going into the actual aviri kudumu recipe procedure let us see the benefits of the dal.
It increases iron content in the body. Iron is a very vital haemoglobin component that helps in energy production. Urad dal contains fewer calories and fat content.
Urad dal is a rich protein source. Proteins play an important role in muscle building and the overall development of the body.
Urad dal has rich fibre content which helps in enhancing digestion. It has insoluble and soluble fibres. The soluble fibre normally quickens digestion and the insoluble fibre helps in preventing constipation.
Apart from the above-mentioned benefits of urad dal, it also helps reduce cholesterol.
In this post I made aviri kudumu in a cooker vessel, not using any cloth. In a near future post, I will indeed show you how to make it using a cloth.
You can check the link below for more breakfast recipes: Breakfast and Tiffins
Thank you friends for visiting my website. Please like, share and subscribe to easyvegrecipes YouTube channel for video recipes.
Aviri Kudumu Recipe -- How to make Aviri Kudumu (aviri kudumu recipe at home) Author: Sailaja Angara Preparation Time: Cooking time: Servings: 6 people
Aviri Kudumu recipe -- A power packed breakfast.
Ingredients:
2 and 1/2 Cups Whole Urad Dal
Salt to Taste
3 Tsp Ghee
Procedure:
Wash and Soak urad dal for 6 to 8 hours.
Just before making the kudumulu, grind it to a fine and thick paste.
Add salt to it. Mix it well.
We can make a little thin batter also.
Thick batter will make fluffy kudumu.
Do not allow this batter to ferment even for half an hour also.
As soon as grinding is over make the kudumu.
Grease a cooker vessel with 3tsp of ghee.
Spread the ghee evenly.
Pour the batter into the vessel.
Steam it for 15 to 20 mins on a high flame.
Lower the flame and steam for another 5 mins.
Check the kudumu is done or not by piercing a clean knife into it.
If the knife comes out clean it is done.
Serve aviri kudumu recipe with ghee, coconut chutney, nalla karam and bombay chutney.
Hi friends, Today I am giving you the best peanut chikki recipe. It is a power packed, just 2 ingredients recipe. I can assure you all that it is really a healthy peanut chikki recipe. We can have this homemade peanut chikki anytime during the day. Peanut chikki recipe is made with sugar and jaggery both. Chikki made with jaggery is more healthier than the one made with sugar. We can get the benefits of jaggery and also peanuts. Click the link below for more sweets and snacks recipes: Sweets and Snacks Check out for some more healthy sweets made with jaggery: Nuvvula Laddu or Til Laddu Til Chikki Peanut Laddu Sunnundalu or Laddu made with Urad Dal
Thank you friends for visiting the website. Please like, share and subscribe to easyvegrecipes YouTube channel for more video recipes.
Peanut Chikki Recipe -- How to make Peanut Chikki (healthy peanut chikki recipe) Author: Sailaja Angara Preparation Time: Cooking time: Servings: 30 pieces
Peanut Chikki -- A healthy mid-day meal.
Ingredients:
2 Cups Peanuts/Ground Nuts/Palli
2 Cups Jaggery
Ingredient 3
Procedure:
Heat a thick bottomed kadai.
Add peanuts to it and dry roast them till they turn light brown.
This may take around 15 to 20 mins time.
Roast them in low flame only.
Roast them till the skin of the peanuts comes easily.
Once they are done, spread them in a plate and allow them cool completely.
Remove the skin of the peanuts and clean them.
Again heat the same kadai, add 2 Cups of jaggery to it.
Add little water.
Mix it well and allow the jaggery to melt.
Once the jaggery melts completley, let it boil for a minute.
Switch off the stove and add peanuts and mix them swiftly.
Apply a little ghee to a plate or onto the cooking platform.
Spread this mixture and press it forcibly.
If you spread the mixture onto the cooking platform, we can press it using the rolling pin.
Allow it to cool compleltely. Cut it into squares or your desired shapes and size.
Serve peanut chikki recipe anytime during the day. Mid-day is the good time to enjoy the peanut chikki.
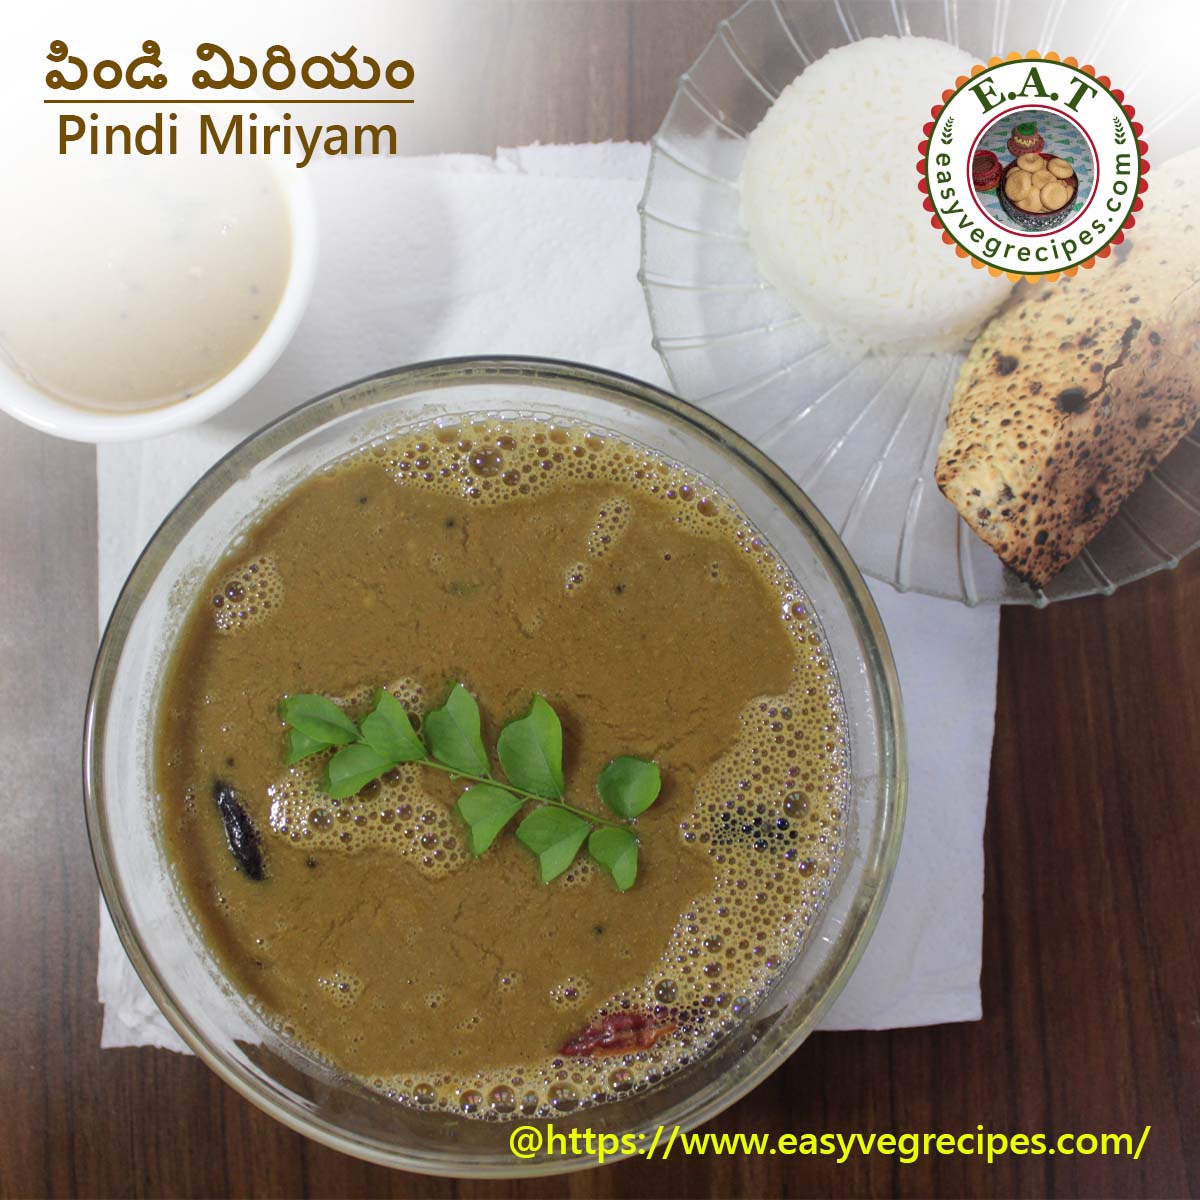
Hi friends, Today I am posting Aratikaya Pindi Miriyam recipe here. Pindi miriyam recipe can be made with Aratikaya(Raw Banana), Kakarakaya (Bitter Gourd) or even with Potlakaya (Snake Gourd) and Potato also. But among others Aratikaya pindi miriyam is very famous. At my parents place it's a special dish on Sundays. As we will be having lot of time to enjoy our lunch. It comes under no onion no garlic recipe, as there is no onion and garlic in it. I tried to make with onion but it did not tasted good. Pindi miryam recipe South Indian style can be served with hot piping rice and fried or roasted papad. The pindi miriyam recipe simple and easy to make. Also click the links below for other pindi miriyam recipes: Kakarakaya pindi miriyam
or Potlakaya pindi miriyam
Thank you all friends for visiting the website. Please like, share and subscribe to easyvegrecipe YouTube channel for video recipes.
Aratikaya Pindi Miriyam Recipe -- How tomake Aratikaya Pindi Miriyam (Pindi Miriyam recipe South Indian style) Author: Sailaja Angara Preparation Time: Cooking time: Servings: 6 people
Aratikaya Pindi Miriyam -- A recipe with no onion and no garlic -- best accompaniment for rice.
Ingredients:
1 medium Aratikaya/Raw Banana
1/2 Tbsp Tamarind
1/4 Tsp Turmeric Powder
Salt to Taste
1/4 Cup Toor Dal
1 Tsp Ghee
1 Tsp Mustard Seeds
1 Tsp Cumin Seeds
1 Red Chillies
A pinch of Asafoetida/Hing
5 to 7 Curry Leaves
1/4 Tsp Oil
1 Tbsp Coriander Seeds
1 Tbsp Black Pepper Seeds
1 Tbsp Dry Coconut
2 Red Chillies
1 Tsp Black Gram
1 Tsp Bengal Gram
1 Tsp Rice
Procedure:
Soak tamarind in water. Extract juci out of it.
Cut raw banana/arati kaya into cubes.
Grate dry coconut and keep it ready.
Wash them, add salt and turmeric powder and pressure cook for 1 whistle.
Wash toor dal and pressure cook for 3 to 4 whistles.
Heat a small kadai, add rice, black gram and bengal gram.
Saute them for a while, add coriander seeds, black pepper, and red chillies.
Fry all of them till the aroma comes out and the colour of the dals changes into light brown.
Fry them in low flame only.
Once they are fried properly, keep them aside.
In the same pan, add grated dry coconut.
Fry it also till it turns into golden yellow color. Keep it aside.
Put all the ingredients into a mixer grinder and grind it
Grind it to a fine paste and keep it aside.
Extract juice from tamarind and keep it aside.
Once the Aratikaya cooked well, add tamarind juice.
Let this boil for 2 minutes.
Cooked Toor dal and the grounded paste to it.
Mix them well and allow this to come to rolling boil.
In another kadai, add little ghee.
Add mustard seeds, cumin seeds, red chillies pieces, curry leaves and asafoetida.
Add the above tadka to the boiling pindi miriyam.
Serve Aratikaya pindi miriyam recipe with hot piping rice and roasted papam.
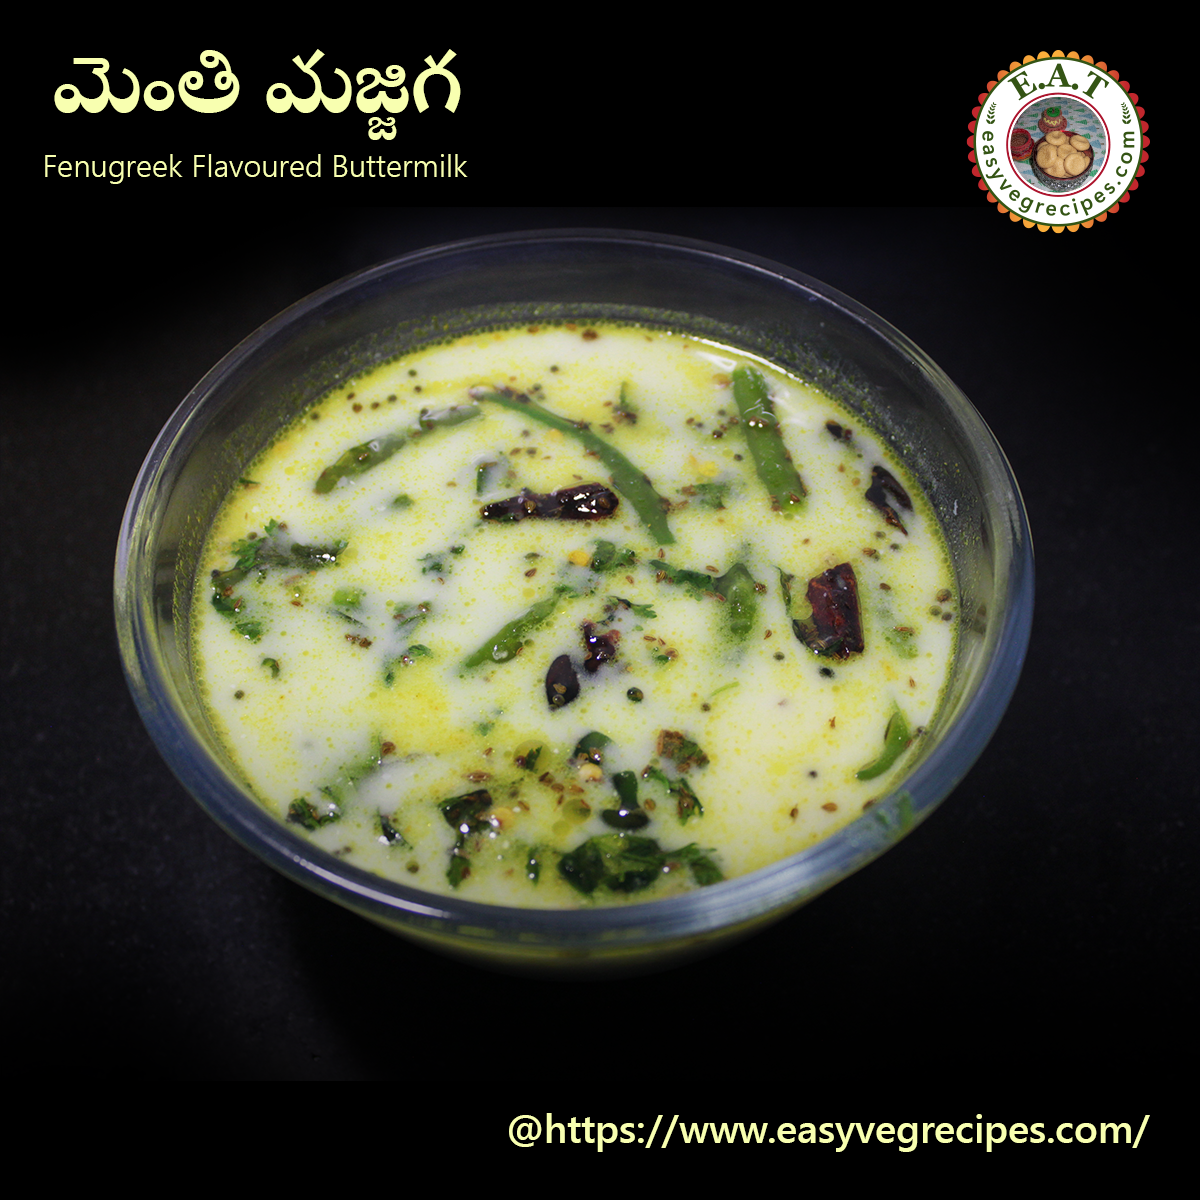
Hi friends, Today's recipe is Menthi Majjiga recipe. A simple and easy recipe made with buttermilk. In this post I am going to give you how to make menthi majjiga. It is a fenugreek flavoured buttermilk. Serves well with rice or we can have as it is also. Menthi Majjiga is completely a Telugu recipe. It is a best accompaniment for Kandi Pachadi recipe. Menthi majjiga benefits are innumerable, the ingredients in this gives good relief for abdominal discomfort due to indigestion. The main ingredient in this recipe is menthi or methi or fenugreek seeds powder. And also ajwain or vamu or voma is a good source for digestion.
Check out the link below for the recipe: kandi pachadi
Thank you friends for visiting my website. Please like, share and subscribe to easyvegrecipes YouTube channel for video recipes and also don't forget ot press BELL icon for further notifications.
Menthi Majjiga Recipe -- How to make Menthi Majjiga (Menthi Majjiga Andhra style) Author: Sailaja Angara Preparation Time: Cooking time: Servings: 6 People
Menthi Majjiga -- Fenugreek flavoured buttermilk -- helps in digestion
Ingredients:
1 Cup Buttermilk
2 Cups Water
Salt to taste
1 Teaspoon Turmeric Powder
1 Teaspoon Asafoetida
2 to 4 Green Chillies
1/2 Tsp Fenugreek Powder
1/2 Tbsp Carom Seeds/Ajwain/Vamu
1 Tbsp Oil
1/2 Tsp Mustard Seeds
1/2 Tsp Cumin Seeds
1 Red Chilli
5 to 7 Curry Leaves
Fist ful of Coriander Leaves
Procedure:
In a bowl take 1 cup buttermilk and add water to it.
Mix it well. Slit green chillies and keep aside.
Add salt, fenugreek powder to it. Mix it well again.
Heat oil in a kadai.
Add mustard seeds, cumin seeds, carom seeds, turmeric powder and red chillies to the hot oil.
When they start spluttering add slit chillies and asafoetida.
Saute them and add curry leaves and coriander leaves.
Add this tempering to the above made buttermilk. Mix well.
Serve Menthi Majjiga recipe as an appetizer or with rice.
Hi friends, Toady's recipe is Kandi pachadi recipe. A chutney made with toor dal. Kandi pachadi recipe is a traditional Andhra cuisine. Whenever we are short of vegetables and cannot get them immediately, kandi pachadi comes in handy. Of course now a days everything is available on a phone click within 15 minutes time, through different E commerce apps, but earlier it was not like that. I already made a post on how to make kandi pachadi but that was included with menthi majjiga. This post on kandi pachadi recipe andhra style is stand alone. Kandi pachadi can be served with hot piping rice and ghee. Kandi pappu pachadi tastes well with menthi majjiga too.
Check out the below link for the recipe: menthi majjiga
Thank you friends for visiting the website. Please like, share and subscribe to easyvegrecipes YouTube channel for detailed video recipes.
kandi pachadi recipe -- how to make kandi pachadi (kandi pachadi andhra style) Author: Sailaja Angara Preparation Time: Cooking time: Servings: 6
Kandi pachadi recipe -- serve it with hot piping rice.
Ingredients:
1/2 Cup Kandi Pappu/Toor Dal/Pigeon Pea
10 to 12 Red Chillies
Salt to Taste
1/2 Tbsp Ghee
5 to 7 Garlic
Small lemon size Tamarind
1/2 Tsp Cumin Seeds
Procedure:
Heat ghee in a kadai, add kandi pappu or toor dal.
Add red chillies also.
Fry it on a low flame till the dal turns into light brown.
Switch off the flame and add cumin seeds.
Allow this to cool completely.
Soak tamarind with very little water.
We should not more water to soak tamarind, just little to make the tamarind wet.
Add all the ingredients into a blender jar.
Add salt to taste and soaked tamarind too.
Grind it to make coarse powder.
Add little water and grind it again.
Repeatedly grind the chutney till we get the right consistency while adding water little by little.
The kandi pachadi should be in semi-coarse texture and stiff.
You can add seasoning like onions and curry leaves. Fry them in little oil and add them.
Serve Kandi Pachadi Recipe with hot piping rice and menthi majjiga.
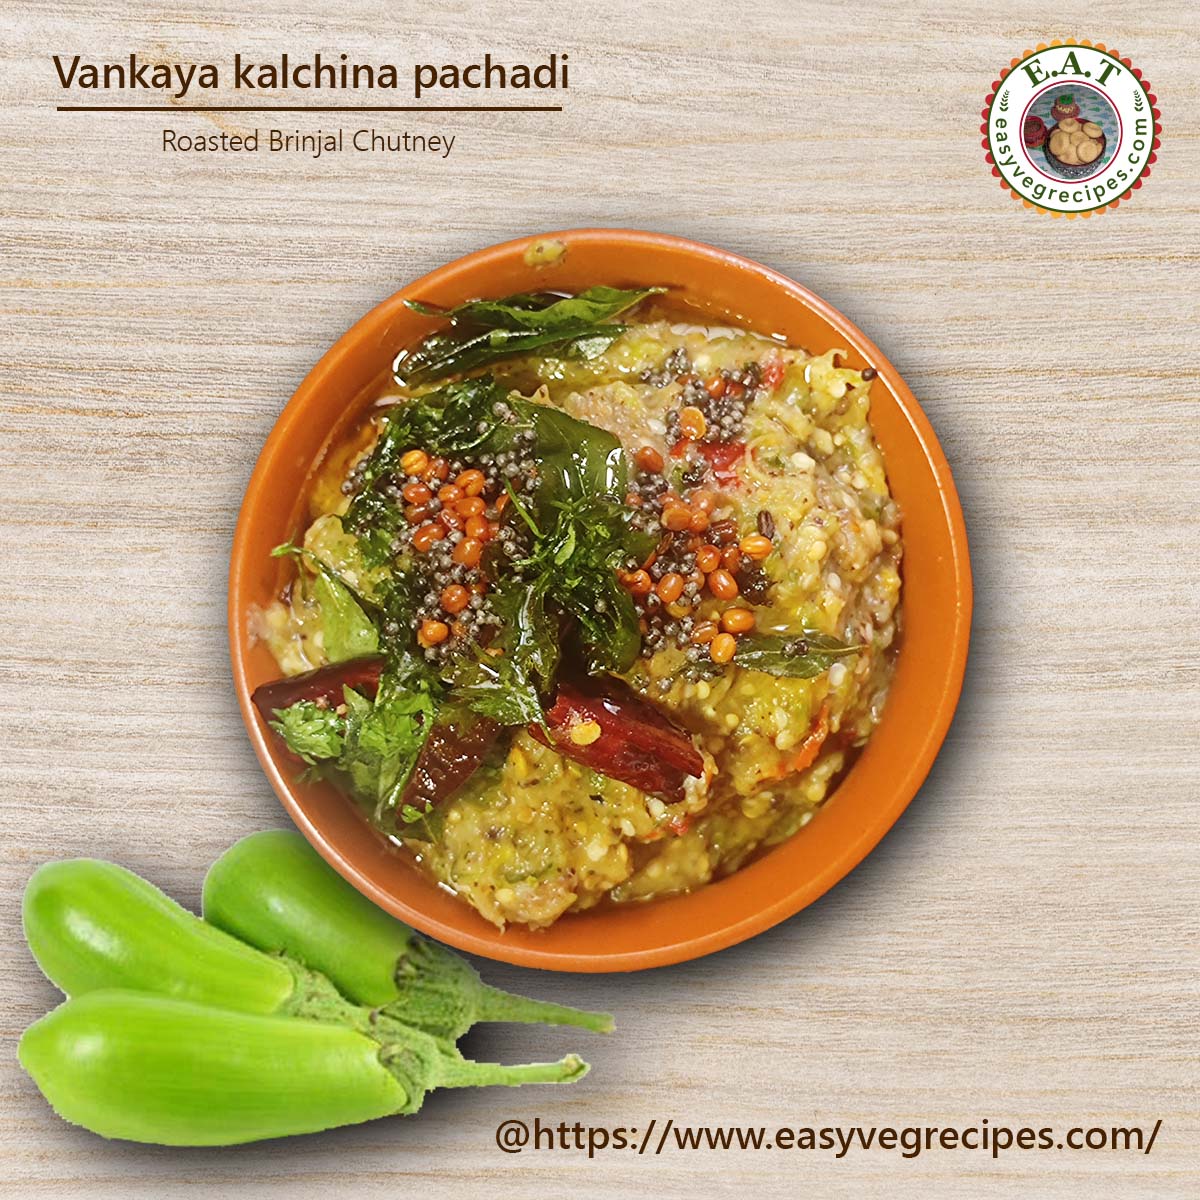
Hi friends, Today I am posting Vankaya roti pachadi recipe. The recipe of Vankaya roti pachadi is Andhra style. Here I mentioned roti, means mortar and pestle. Pachadis are made using mortar and pestle tastes really good. I like chutneys or pachadi the most. I always prefer to make them. The Vankaya roti pachadi recipe and method are very simple and easy. Brinjal and chilli chutney is the best accompaniment for hot piping rice. If we have mortar and pestle we can use it otherwise we can make the Andhra style brinjal chutney in the mixer grinder also. There are different ways to make this pachadi. This is Andhra style Brinjal Chutney. We use big brinjal to make this chutney.
I already posted different ways of making Vanakaya pachadis like Roasted Eggplant chutney, Vankaya pachadi in the website. Check out them also for recipes.
Thank you friends, for visiting. Please like, share and subscribe to easyvegrecipes YouTube channel also for video recipes. And don't forget to hit the BELL icon for further notifications.
Vankaya Roti Pachadi Recipe -- How to make Vankaya Roti Pachadi (Brinjal Chutney Andhra Style) Author: Sailaja Angara Preparation Time: Cooking time: Servings: 6 People
The best accompaniment for hot piping rice -- Vankaya Roti Pachadi recipe Andhra style
Ingredients:
2 Big Vankaya/Brinjal/Baingan
Small pebble size Tamarind
3 Tbsp oil
1/2 Tbsp Black Gram
1/2 Tbsp Mustard seeds
1/4 Tsp Fenugreek Seeds
1/4 Tsp Hing/Asafoetida
10 to 15 Green Chillies
5 or 6 Garlic
5 or 6 Curry Leaves
Salt to Taste
Ingredients For Tampering:
1 Tbsp Oil
1/2 Tbsp Black Gram
1/2 Tbsp Mustard Seeds
1/4 Tsp Fenugreek Leaves
2 Red Chillies
1/4 Tsp Hing/Asafoetida
3 to 5 Curry Leaves
Fistful of Coriander Leaves
Procedure:
Wash vankaya/brinjal/baingan thoroughly.
Wipe them with a cloth or kitchen tissue.
Apply oil and put them on the stove top directly.
Roast them on a low to medium flame.
Roast them till the entire vankaya or brinjal skin turns blac k.
Turn them in-between, so that the entire vankaya/Brinjal roast well.
Once done, remove from the flame.
Take water in a small vessel, put the roasted vankaya/Brinjal in it and allow this to cool.
Soak tamarind in little water.
Heat oil in a kadai.
Add black gram, mustard seeds, fenugreek and hing.
Saute them well.
Add garlic and green chillies and curry leaves. Saute them well. Keep it aside.
Once the vankaya / brinjal cooled completely, peel the skin.
The skin have to be peeled with our fingers itself. We cannot use any peeler.
Cut the heads of the vankaya.
In a blender jar add the above tadka, salt and tamarind.
Grind it coarsely.
Add the roasted vankaya/brinjal, then press the whip or pulse button on the mixer grinder.
If doing the pachadi using mortar and pestle, first mash the tadka, with salt and tamarind.
Then add the roasted vankaya and mash it thoroughly.
Transfer it to serving bowl and tamper it with the tadka.
Heat oil in a kadai, add all the ingredients under "Ingredients for Tampering".
Allow them to splutter and add them to the pachadi.
Serve Vankaya Roti Pachadi Recipe with hot piping rice.
Hi friends, Today's recipe is Cabbage Pachadi Recipe. The Andhra cabbage pachadi recipe I made using mortar and pestle. Cabbage Pachadi recipe can be made using mixer jar also. Here I am presenting cabbage pachadi in Andhra style. Pachadi or chutney is the integral part of Telugu food menu. Everyday we need to have one roti pachadi or chutney made with mortar and pestle. Serve cabbage pachadi with hot piping rice.
thank you friends for visiting my website. Please like, share and subscribe to my easyvegrecipes YouTube channel and also press the BELL icon for further notifications.
Cabbage Chutney Recipe -- How to make Cabbage Pachadi Recipe(Andhra Cabbage Pachadi) Author: Sailaja Angara Preparation Time: Cooking time: Servings: 6 people
Cabbage Pachadi Recipe -- a best accompaniment for hot piping rice.
Ingredients:
1 Cup Cabbage
2 Green Chillies
Salt to Taste
1/2 Tsp Turmeric Powder
small pebble size Tamarind
2 Tbsp Oil
2 Tbsp Mustard Seeds
2 Tbsp Black Gram
1 Tsp Fenugreek Seeds
10 to 12 Red Chillies
1 Tsp Asafoetida
4 to 6 Curry Leaves
Procedure:
Chop cabbage finely and wash under water thoroughly.
Soak tamarind in little water.
Heat 1 Tbsp oil in a kadai, add 1 tbsp mustard seeds, 1 tbsp black gram, 1 tbsp fenugreek seeds and asafoetida.
When they start spluttering add red chillies and saute them till they turn little dark.
Keep this tadka aside.
Again heat oil in the same kadai, add chopped cabbage and green chillies.
Cook the cabbage till it become soft.
Once done allow this to cool.
Add the tadka to the blender jar, add salt, soaked tamarind and turmreic powder.
Blend it once. Again add cooked cabbage and blend it again to make pachadi.
If you are using mortar and pestle first mash the tadka along with salt, turmeric powder and tamarind.
Then add the cabbage and green chillies. Mash it till the cabbage mashed completely. This may take 10 minutes time.
once done take the cabbage pachadi into a serving bowl and temper with tadka.
For tadka, heat 1 tbsp oil in a kadai, add black gram, mustard seeds, fenugreek seeds, red chillies, asafoetida and curry leaves.
Once they start spluttering temper this on the cabbage pachadi.
Serve cabbage chutney recipe with hot piping rice.
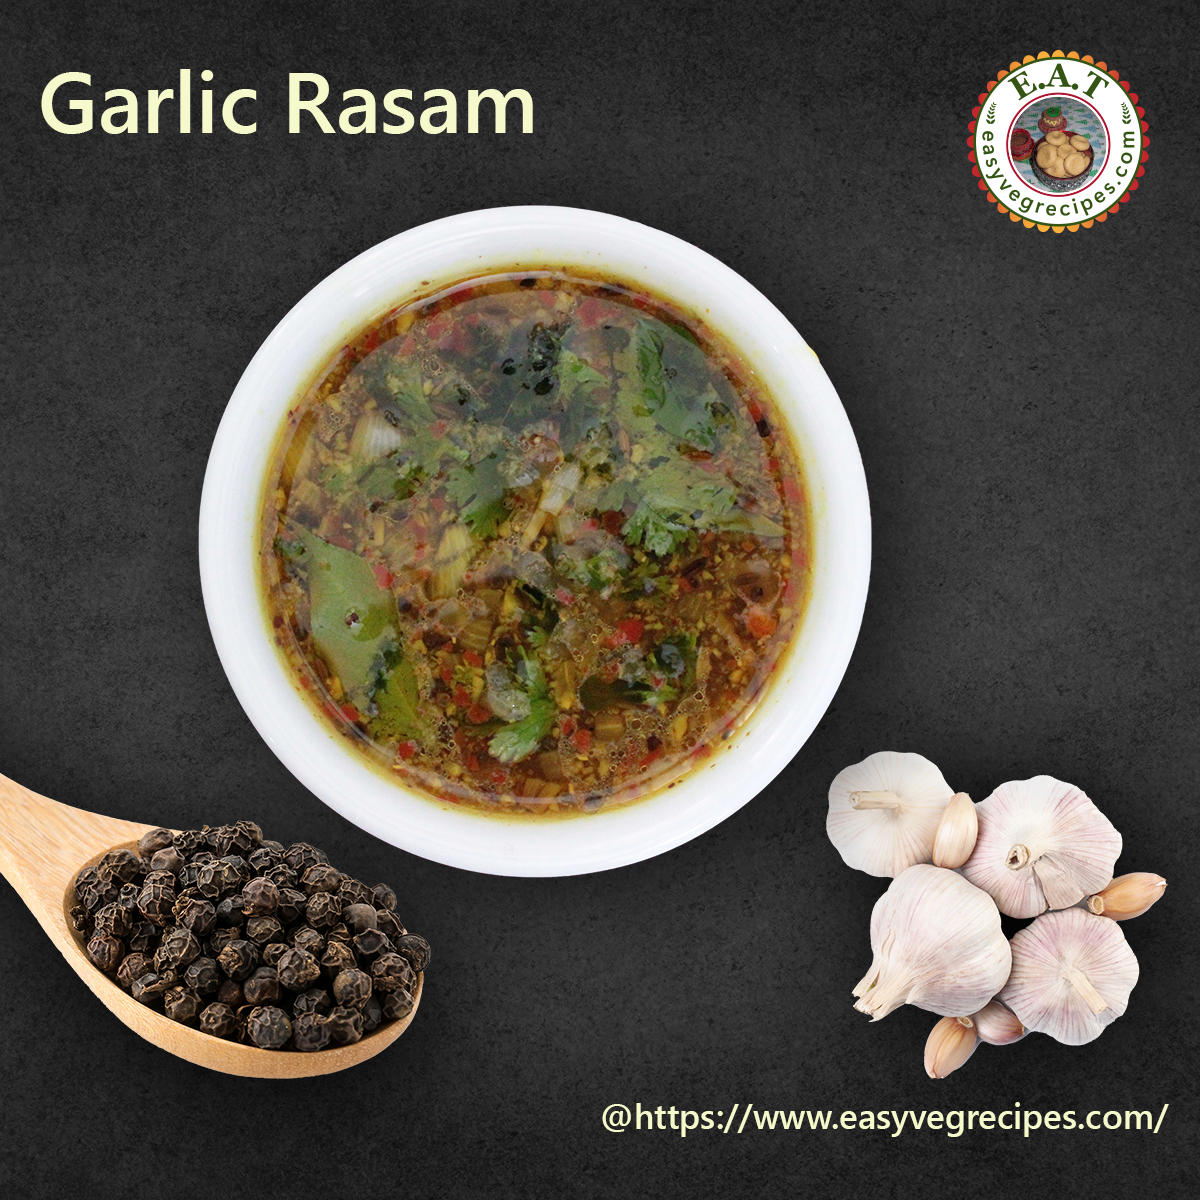
Hi friends, Today I am going to post a recipe for garlic rasam. It is the best garlic rasam recipe I ever come across. My MIL used to make it whenever she feels like cold and cough. While making it she used to explain to me garlic rasam benefits. It is really a healthy and simple garlic rasam recipe. She shared different varieties of South Indian garlic rasam recipes. But among them I found this is the easiest garlic rasam recipe. Now I woul like to share with you all the recipe. This garlic rasam recipe can be served directly or serve it with hot piping rice.
Thank you friends for visiting my website. Hope you all like my recipes. Suggestions and comments are welcomed and can be posted below each post. Please like, share and subscribe to my easyvegrecipes YouTube channel for video recipes.
Garlic is good for health. I am mentioning some of the health benefits of the garlic which I too experienced. Health benefits of Garlic and Black Pepper:
Garlic is low in calories and rich in vitamin C, vitamin B6, and manganese. It also contains trace amounts of various other nutrients.
Garlic supplements may help in preventing and reducing illnesses like common cold, flu and cough.
The active compounds may help in reducing the high blood pressure.
And also it helps in controling the LDL cholesterol (bad cholesterol) in blood.
It is also helps in reducing the backpain in women due to the regular menstrual cycle.
Garlic Rasam Recipe -- How to make Rasam with Garlic and Peppercorns Author: Sailaja Angara Preparation Time: Cooking time: Servings: 6 People
Garlic Rasam Recipe -- recipe of spicy garlic rasam
Ingredients:
1/2 Cup Tamarind Juice
10 - 15 Garlic Cloves
1 Tablespoon Black Pepper
1 Red Chilli
Salt to Taste
1 Teaspoon Turmeric Powder
1 Tablespoon Oil
1 Teaspoon Mustard Seeds
1 Teaspoon Cumin Seeds
5 to 7 Curry Leaves
4 to 6 Coriander Leaves
Procedure:
Soak tamarind and take juice of it.
Grind garlic, red chilli and black pepper to make a coarse powder.
You can use mortar and pestle to make the powder also.
This will brings out the perfect aromas from the garlic and black pepper.
Heat oil in a deep frying pan, add mustard seeds, cumins seeds, curry leaves and coriander leaves.
Once they start spluttering add garlic, pepper powder.
Fry them for two minutes, add tamarind juice to it.
Add 1/2 to 1 cup of water if necessary.
Add salt and turmeric powder. Allow it to boil for five minutes.
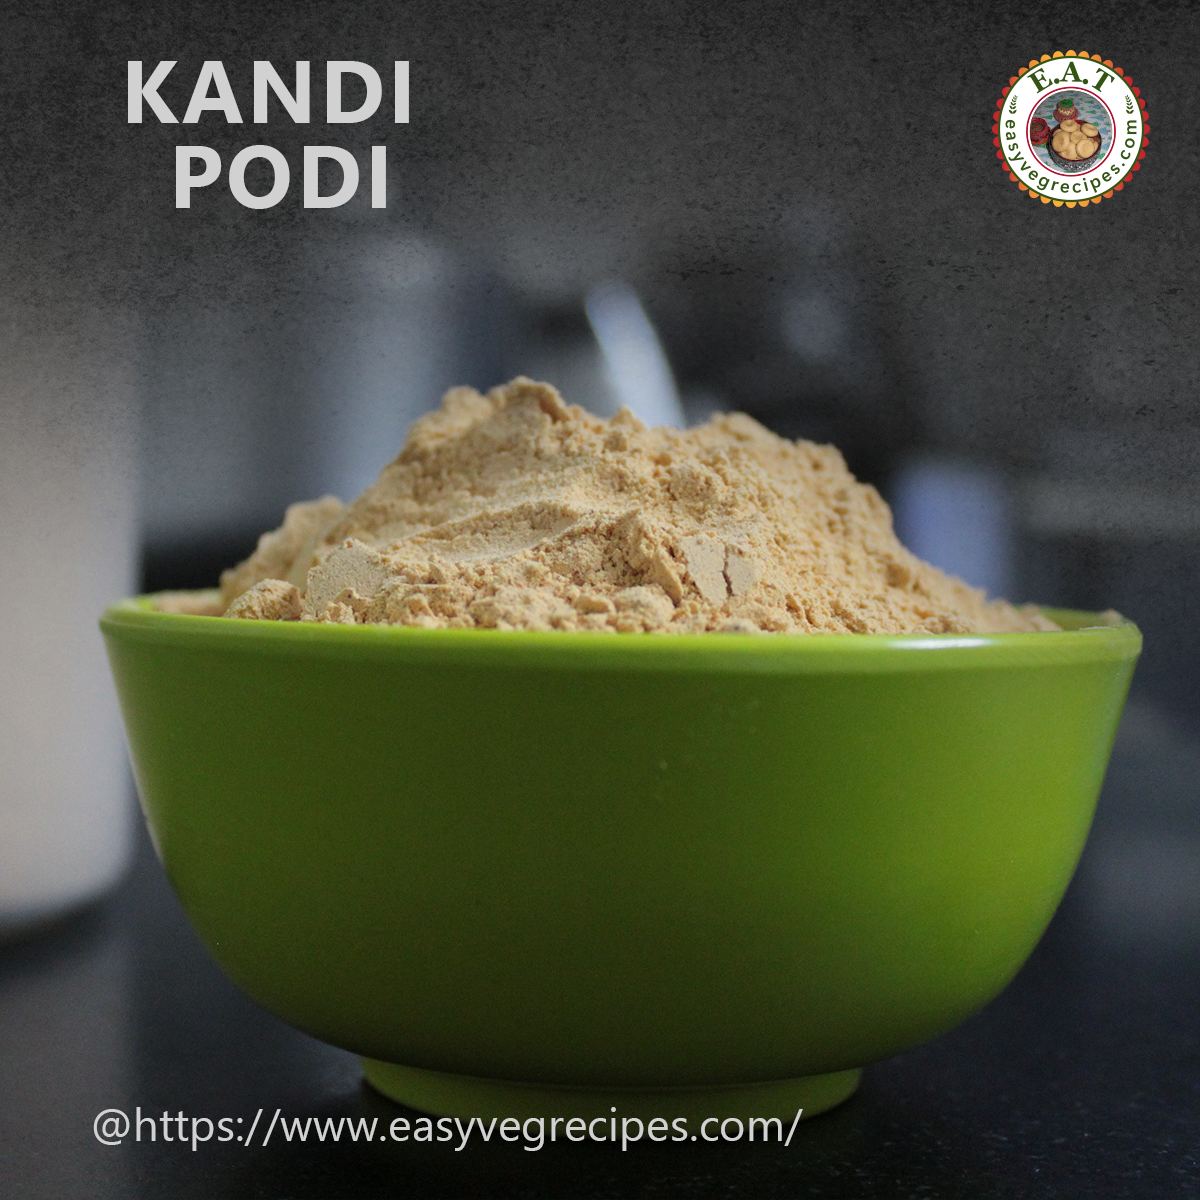
Hi friends, Today's recipe is Andhra Kandi Podi Recipe. This is an authentic Andhra Kandi Podi recipe. I have learned this from my mom. She is an expert in making kandi podi and podi chutney. She used to make them available through out the year.
Kandi Podi is a flavoursome, protein-packed, lentil-spice blend powder, it is a classic Andhra recipe. The ingredients for kandi podi are readily available in our own kitchen. This kandi podi goes well with rice and also with dosa and idli as side dish. Whenever we don't feel like cooking and also can't get from outside kandi podi comes in help. Making of Kandi podi needs a lot of patience. We have to dry roast each and every dal or lentils separately in a medium to low flame. They all have to be powdered together and sieve to get the fine powder.
Thank you all for visiting my website. Hope you like all my recipes. Please like, share and subscribe to my easyvegrecipes YouTube channel for video recipes.
Andhra Kandi Podi Recipe -- How to make Andhra Kandi Podi -- Kandi Podi Andhra Style Author: Sailaja Angara Preparation Time: Cooking time: Servings: 1 KG
Andhra Kandi Podi -- Serve it with rice, idli and dosa.
Ingredients:
1 Cup Red Gram / Toor Dal
1 Cup Green Gram / Moong Dal
1 Cup Bengal Gram / Chana Dal
1 Cup Black Gram / Urad Dal
2 Cups Red Chillies /Lal Mirchi
1/2 Tsp Cumin Seeds
Salt to Taste
Procedure:
Heat kadai.
Dry roast each dal separately.
Begin with Toor Dal, the main ingredient.
On a medium flame roast it till turn little brown.
Do not burn them.
Once done, take it to a wide plate and keep it aside to cool.
Now again heat the kadai, add moong dal and roast it.
when the dal changes colour, add this to the above toor dal.
In the same manner roast chana dal and then urad dal.
Roast urad dal in the last only as it takes a longer time to roast, so the kadai should be very hot.
Add them to the above dals to cool.
Heat the kadai again add little salt, as little as 1/2 tsp, to it.
Add red chillies and roast them also.
Adding salt before the red chillies would stop the pungent aroma of chillies coming out.
Add them also to the the above pulses. Add cumin seeds also to the lentils.
Allow all of themto cool completely.
Grind small portions of the pulses along with red chillies.
sieve it and again grind it till the entire powder become fine.
Serve Andhra Kandi Podi recipe with hot piping rice, or serve it with idli or dosa as the side dish along with a spoonful of oil.
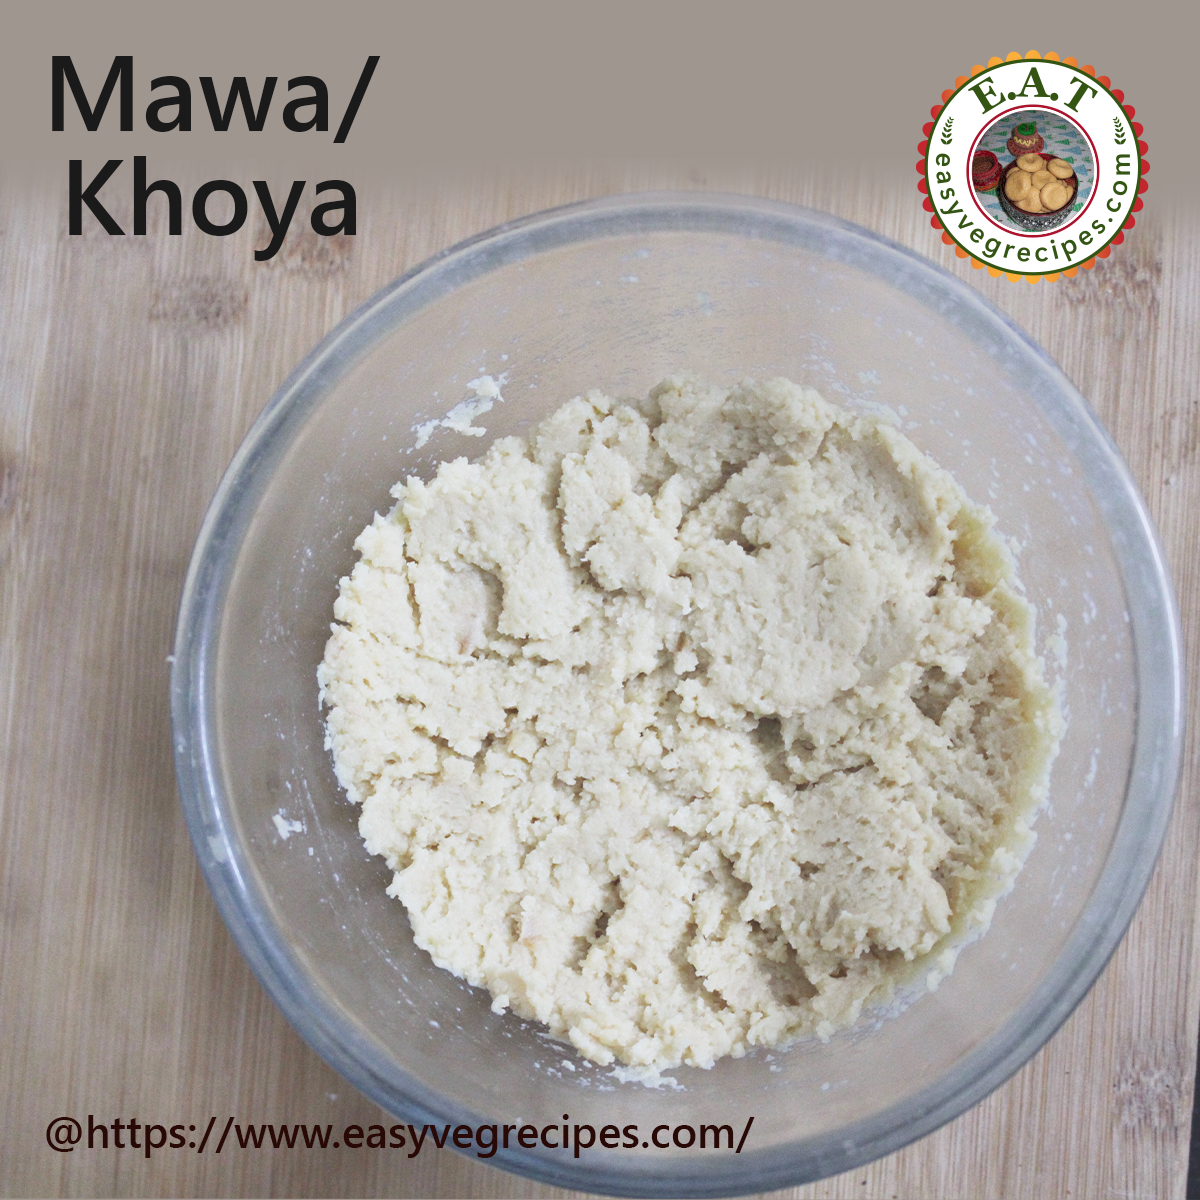
Hi friends, Today's recipe is mawa or khoya recipe. Unsweetened khoya recipe at home. We have lots of sweets made with fresh mawa or khoya. This is the festival season, so we have to keep the fresh khoya at home to make different varieties of sweets. But at times we may not get fresh mawa or khoya or even if we get it may not be suitable to make certain sweets. We can make unsweetened khoya at home and keep it available for making sweets at such difficult times. This plain mawa can be stored in refrigerator for 5 to 7 days. Homemade mawa is the best to make gulab jamuns at home. Of course making of khoya at home is not an easy task, it takes lots of time and we need to have lot of patience also, but here ends justify the means, so to achieve the best result we have to face the process.
Here I am posting the traditional way of making plain mawa recipe, I will surely be posting the other procedures also at a later time. Now let us come to the original recipe, unsweetened khoya recipe. We need only one ingredient that is MILK to make this fresh khoya. I used my regular 3% fat packet milk to make the khoya or mawa, if you get full fat milk you can use it. Khoya made with full fat milk makes tasty and also the process can be done a little bit faster.
With the khoya at home we can make:
Gulab Jamun Besa Khoya Laddu Carrot Halwa
and many more recipes.
Thank you all for visiting my website. Hope you like all my recipes. Please like, share and subscribe to my easyvegrecipes YouTube channel for more video recipes.
Mawa Recipe -- How to make Mawa at home -- Unsweetened Khoya Recipe Author: Sailaja Angara Preparation Time: Cooking time: Servings: 260 Grms
Mawa or unsweetened khoya at home -- can be made different varieties of Indian sweets with it.
Ingredients:
1 and 1/2 ltrs Milk
Procedure:
Wash a thick bottomed kadai.
Pour half cup of water.
Pour 1 and 1/2 ltr milk into it.
Boil the milk in high flame.
Simmer the flame and stirring ocassionally allow the milk to boil.
Let the milk boil completely and evaporates the entire water.
While stirring ocassionally, scrape the sides of the pan too.
Once the entire water present in the milk evaporates and the moisture present in the milk also dissolves.
This is the time when we see no bubbles in the reduced milk, switch off the flame.
Spread this dough like mixture into a plate with the help of a spatula and allow this cool completely.
store the cooled khoya or mawa in an airtight container and refrigerate for 5 to 7 days.
The mawa or khoya recipe can be used whenever necessary for sweets.
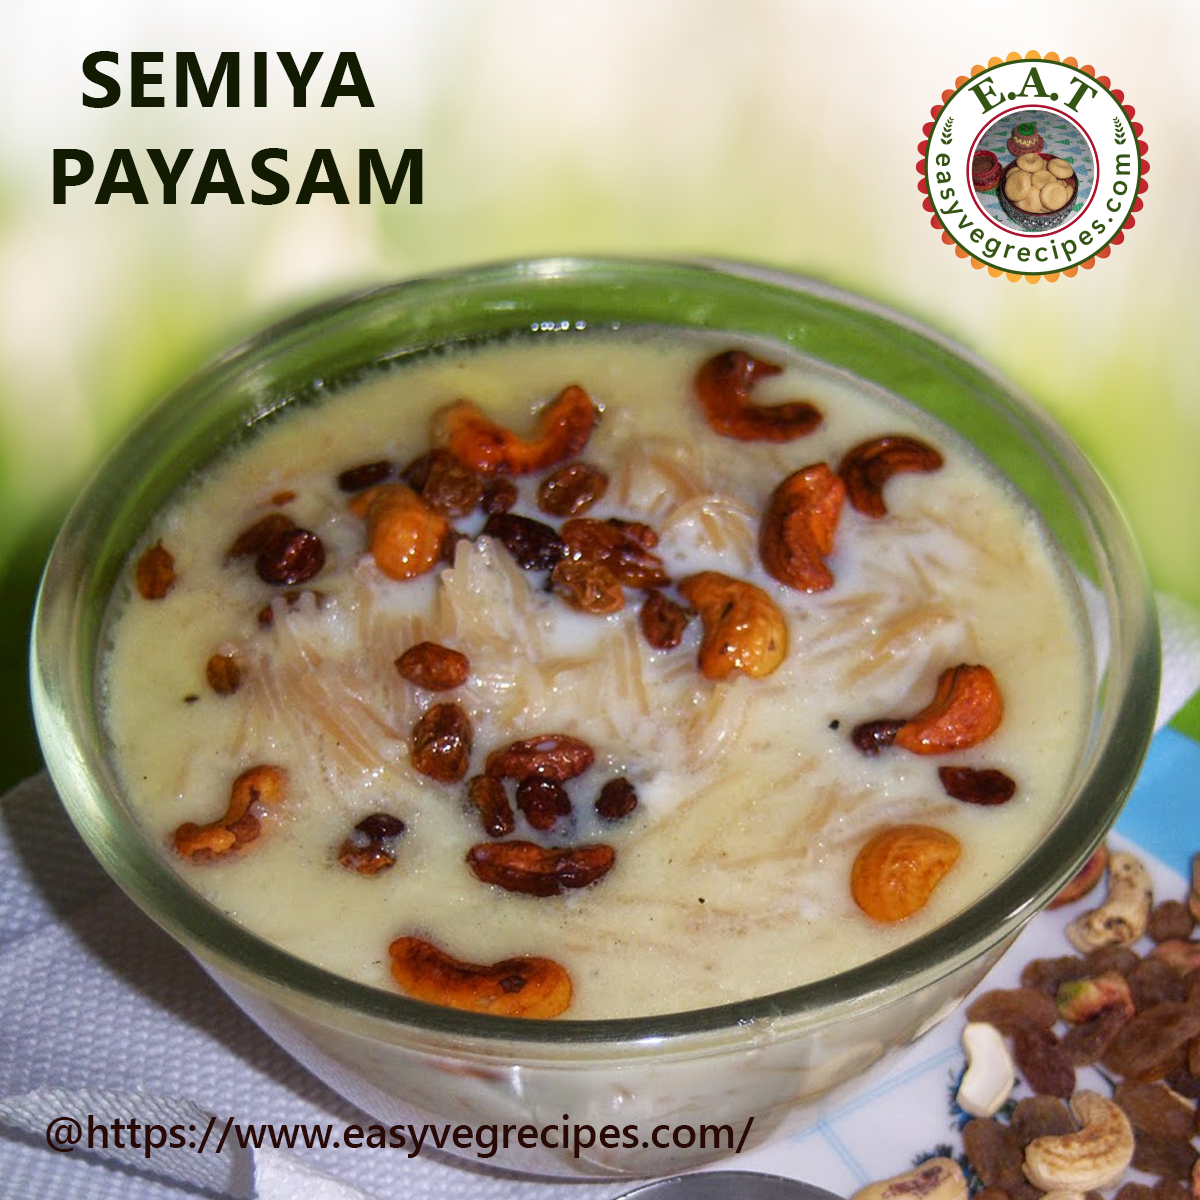
Hi friends, thank you all for visiting my website and @EATeasyvegrecipes youtube channel. Today's recipe is Semiya Payasam. This is the easy semiya payasam recipe. When we crave for sweet make semiya payasam and serve. I have a sweettooth, among the sweets semiya payasam is my first choice. It is very easy to make semiya payasam. Any beginner can also make semiya payasam without any doubts. Semiya or vermicelli cooked in milk and added sugar and nuts gives it a nice flavourful taste. It is also offered to goddess Durga during durga puja or navratri time. Check out for other festival sweets here: Saggu biyyam Payasam Suji Halwa Sakkara Pongal Wheat Flour Halwa
Click the video link for detailed recipe video. Please like, share and subscribe to easyvegrecipes YouTube channel. And hit the BELL icon for further notifications.
Semiya Payasam Recipe -- How to make Semiya payasam Recipe (easy Semiya Payasam) Author: Sailaja Angara Preparation Time: Cooking time: Servings: 4 People
Semiya Payasam Recipe -- A simple sweet can be served anytime.
Ingredients:
1 Cup Semiya/Vermicelli
4 Cups Milk
2 Cups Sugar
1 Tbsp Cashew Nuts
1 Tbsp Kismis/Raisins
1 Tsp Cardamom Powder
1 Tbsp Ghee
Procedure:
Heat ghee in a thick bottom kadai or pan.
Fry cashew nuts and raisins till they turn light brown color. Keep them aside.
Again heat the same kadai, and fry semiya till it turns into light brown color. Keep it aside.
Boil milk in another pan. Let the milk thicken a bit.
Once the milk reaches the boiling point add the milk to the above fried semiya and allow it to boil.
Stirring ocassionally, cook the semiya till it becomes soft.
Cook till the milk thickens more. It will attain a sligh creamy texture.
Add sugar to the above vermicelli and mix it well.
Allow this to boil for 5 minutes or until the sugar melts completely.
Add crushed cardamom powder to it and again allow this boil for a minute.
Add fried nuts to the semiya payasam and mix well.
Serve semiya payasam hot or chill, the way you want.